Face Cutter is a valuable modeling tool designed to cut an agon's face quickly.
It lets you make perpendicular cuts (or turns) on the selected surface through easily-defined Snapping points.
It's a convenient tool for performing general modeling tasks, and itd offers better functions than the K knife feature. It is also like Ctrl R within blender. However, this tool is compatible with the cons, too.
Usage
Edit mode > Choose one face or several faces
Right-click to open the Context Menu, and choose "Face Cutter" at the end of the list.
Basic Cut
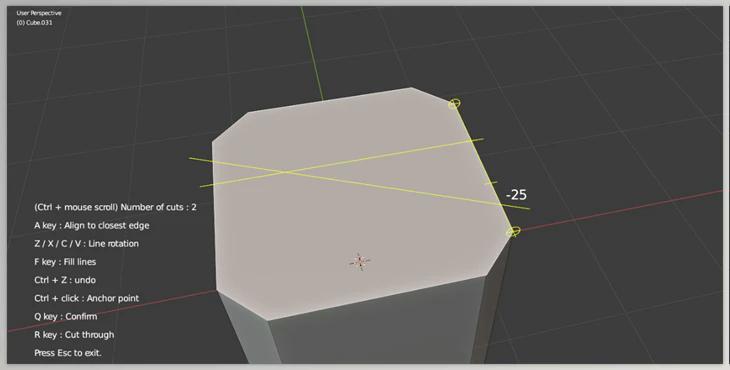
Choose the area (highlighted in yellow). You can create "cutting lines" on the snapping point or wherever else.
The possibility of increasing the snapping points with mouse wheel scrolling. (or you can utilize the square bracket keys).
After you have set the cutting points After setting the cutting points, you can press the Q key to initiate cutting.
Note that you can hold the Shift anytime to turn off snapping.
Get through
To cut the mesh, you must press the R key to initiate the cutting.
You can also use Shift + R to restrict the cut to only linked faces.
Lines to Fill Lines
It is easy to fill in all snapping points using lines by pressing the F key.
Turn the Line
Z key or X key: Turn the line 5 degrees.
C or V keys The line will be rotated by 1 degree.
Align the line to the edge.
The line can be aligned quickly by pressing the key.
Simply move your mouse close to the edge and hit the A key.
To reverse the line back to the original angle (perpendicular), Move your cursor towards your initial chosen edge and press the key.
Full-width Mode
If you are working on several faces, there are times when you need to work with the entire site instead of a slight edge segment. Press the W to switch to full-width mode.
If you select Full-Width Mode, The tool will attempt to use the entire side (all edges with co-linear edges).
Multiple Cutting Lines
You can design multiple cutting lines on different edges.
The tool lets you make cutting lines on one side. Press the Esc key to return to the "Edge selection" state, then choose a different edge as the base. Then, create new cutting lines. After all the lines created are set, press the Q or R to start the process.
Undo
Press the Ctrl + Z keys to erase a cutting line (remove the last line added). (below is the image of the tool hint text)
Symmetric Copy
The easiest way to do this is to copy all cutting lines onto a different side by pressing the S key.
If you copy the cutting lines in mirrored form.
Cutting Corner (45-degree shortcut)
Pressing the D key, you can set the line's rotation to 45 degrees. After pressing D, you can change it back to -45 degrees. It's an excellent tool for cutting corners.
Easy Edit Mode
Press the E at any time to switch to Easy Edit mode.
In this mode, all snapping points will appear. You can select the points to draw a cutting line quickly. This is an excellent method of creating cutting lines diagonally between many edges.
Pressing the E key will close the mode.
Key to Number for Snapping Points
You can use the Number keys 1-9 to directly adjust the snapping point number.
Cut on multiple Non-planar Faces.
You could still cut if you select faces with various normals (non-planar). The cuts will then be "projected" onto the faces. If you choose the base edge, you must select one face to align (shift the cursor close to it).
Cut and Break
The T key can cut through the mesh and break it into chunks.
Additionally, you can use Shift + T to limit the cut-break to only linked geometries.
Extra Note
If you have scaled your object using Object Mode, applying the transform before applying the Face Cutter is necessary, or else it could cause issues.
New Changes:
I mistakenly break the tool, and it will error in 1.6.3
Please update to this version (it fixed the bug in 1.6.3)
